Every
time you look over a race engine you will notice most of the hoses are
covered with a stainless braid. This stainless wrap protects the hoses from
punctures or cuts. Very important in racing. Constant rubbing against body
parts or even other hoses, tends to damage an unprotected one. Not only does
this wrap work, it really looks cool.
There are two ways of fabricating these hose assemblies. One uses a
swaged-on collar to fasten the hose to the fitting, while the other uses
reusable AN fittings. The majority of these assemblies that you see on Hot
Rod, boats etc. are made up with reusable AN fittings.
Until now, fabricating these hose assemblies has been a "pain in the end of
your fingers". That's putting it lightly. Once you get the hose cut to size,
it needs to be installed into the socket part of the fitting. This can
become outright bloody. You see, during the cutting process, some of the
braid wants to go off in another direction. This gives you the dreaded
"fuzzy" end. You might as well get the Band-Aids out now. Well, you can keep
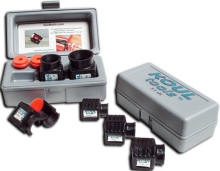
the Band-Aids in the cabinet. A Lake Havasu AZ based company called KOUL
tools LLC has come with an assembly kit that virtually
makes the task a snap. The Koul tool funnels the fuzzy ends of the braided
hose into the fitting in less than 10 seconds. Remember, this used to take
several minutes or even a re-cut and start over. Making up a hose assembly
can now be done in your garage, and you don't have to be a "hose pro."
It's simple and here are a few tips on how to build a KOUL hose.
After you
carefully measure the length of hose you need, mark it. When calculating
the length of the hose, don't forget the hose goes into the socket up to
the threads. It's a good idea to double check yourself and take the hose
over and hold it up to see if the length is correct. Remember the old
saying, " measure twice, cut once". This hose doesn't come cheap, so
it's not a bad idea.
Photo 1
Photo 2
Photo 3
Give a couple of wraps of black or gray tape around the hose using the mark
as it's center.
Photo 4
I use an abrasive cutoff wheel to cut my hoses. Line up the cutoff wheel so
it's in the middle of the tape. Be gentle in the cutting process and cut the
hose. You can also use a 32 tooth hacksaw, sharp chisel or Beverly shear to
cut the hose.
I have always used the cutoff wheel with pretty good success. If you do get
some wild hairs, (stainless braid strands) cut them off.
Photo 5 The hose on the right is a pretty good cut. The hose on the left is one I
heard about, but never really experienced. The braid is delaminating from
the hose. It is on the verge of unusable, even with the KOUL tool. Without
the tool, it's scrap. We are going to show you how to save it.
Photo 6 Stick a blowgun in the opposite end of the hose you just cut and clean it
out. Don't blow it from the end you just cut.
Wear safety goggles during this step.
Install the socket part of the fitting into the KOUL tool capsule. The
socket needs to be snug in the capsule. All the sockets are a little
different from the various manufactures, so some spacers are required to
snug up the socket into the funnel. The spacers are included in the
kits. (see photo 8) After the socket is resting properly in the capsule,
attach the other side of the capsule and clamp it into a vise. You can
install the hose into the socket without a vise, but you need to grip it
tight enough to keep the socket from rotating. If the socket rotates,
the tool will not perform. By the way, you don't need to worry about
vise marks. This is just not another plastic tool. The composite
material the tool is made from is the same material used in sprockets
and chain rollers. It's a glass filled nylon. A test tool has seen 800
installations WITH VERY LITTLE WEAR. It also won't mark
up the fittings like aluminum would.
Photo 7
Photo 8
Photo 9 Before
you install the hose, wipe your finger tip with a little grease and spread
it into the funnel of the tool. It just makes it slide in that much easier.
The next part is very important.
You need to twist or screw the hose into the socket. If you just push it
straight in, it will fail. TWIST THE HOSE IN. If the hose
delaminates like the one in Photo 6, help the wild ones into the funnel so
the hose doesn't delaminate anymore. It will go in if the delamination
doesn't spread too far into the hose.
Photo 10
Pull the assembly out of the capsule and check if the hose is in
the proper distance. It's not unusual to push it in too far with the KOUL
tool. Just unscrew it back out till the threads are in the correct position.
Photo 11
Lube the threads of the fitting.
Photo 12
Mark the hose with a reference point to be sure you don't push it out during
assembly. I use tape, but a marker will work.
Photo 13 Screw in the fitting till your about a 1/16" from the bottom. Don't get to
carried away with over powering it. Make sure that the mark on the hose
hasn't moved out during the assembly. If it did, unscrew the fitting and
start over. If everything looks good, run some solvent thru the hose and
blow it out again. Be sure it's clean. If you can pressure check it, all the
better. Oil the threads and you are ready to install the assembly. It's not
that hard anymore.
This site has been
created & maintained by Good Vibrations Motorsports. All
text and material are copyright 1989-2026 by Good Vibrations Motorsports. All logos and images are reserved.
 Every
time you look over a race engine you will notice most of the hoses are
covered with a stainless braid. This stainless wrap protects the hoses from
punctures or cuts. Very important in racing. Constant rubbing against body
parts or even other hoses, tends to damage an unprotected one. Not only does
this wrap work, it really looks cool.
Every
time you look over a race engine you will notice most of the hoses are
covered with a stainless braid. This stainless wrap protects the hoses from
punctures or cuts. Very important in racing. Constant rubbing against body
parts or even other hoses, tends to damage an unprotected one. Not only does
this wrap work, it really looks cool.


 The hose on the right is a pretty good cut. The hose on the left is one I
heard about, but never really experienced. The braid is delaminating from
the hose. It is on the verge of unusable, even with the KOUL tool. Without
the tool, it's scrap. We are going to show you how to save it.
The hose on the right is a pretty good cut. The hose on the left is one I
heard about, but never really experienced. The braid is delaminating from
the hose. It is on the verge of unusable, even with the KOUL tool. Without
the tool, it's scrap. We are going to show you how to save it.  Stick a blowgun in the opposite end of the hose you just cut and clean it
out. Don't blow it from the end you just cut.
Stick a blowgun in the opposite end of the hose you just cut and clean it
out. Don't blow it from the end you just cut. 

 Before
you install the hose, wipe your finger tip with a little grease and spread
it into the funnel of the tool. It just makes it slide in that much easier.
The next part is very important.
Before
you install the hose, wipe your finger tip with a little grease and spread
it into the funnel of the tool. It just makes it slide in that much easier.
The next part is very important.


 Screw in the fitting till your about a 1/16" from the bottom. Don't get to
carried away with over powering it. Make sure that the mark on the hose
hasn't moved out during the assembly. If it did, unscrew the fitting and
start over. If everything looks good, run some solvent thru the hose and
blow it out again. Be sure it's clean. If you can pressure check it, all the
better. Oil the threads and you are ready to install the assembly. It's not
that hard anymore.
Screw in the fitting till your about a 1/16" from the bottom. Don't get to
carried away with over powering it. Make sure that the mark on the hose
hasn't moved out during the assembly. If it did, unscrew the fitting and
start over. If everything looks good, run some solvent thru the hose and
blow it out again. Be sure it's clean. If you can pressure check it, all the
better. Oil the threads and you are ready to install the assembly. It's not
that hard anymore.